Summary
The purpose of this document is to outline all of the methods, practices, software and hardware (both HiFi and LoFi) I use to Get Things Done. This will provide a general outline of my system including keeping track of actions, projects, calendar items, contacts, etc. Most of my system is based on David Allen’s Getting Things Done methodology with many modifications and fluctuations to suit my needs. I will basically lay this out in the order of my “flowâ€. From capture to compartment to practice. I will then outline my e-mail processing.
Tools
Capture Device Paper – Moleskine
Physical Inbox- Ikea Dokument
Next Actions/Projects and Lists – Backpack
Calendar/Contacts – Now Up-to-Date and Contact
Small Notes/Bits/Misc. Info – Notational Velocity
Vertical Mapping – OmniOutliner Pro
E-mail – Mail.app
Research/Notes – NoteTaker
Physical Notes – Levenger Notepads/Large Moleskine
Capturing Device – Paper
I use a Moleskine Lined Pocket Notebook as my main capturing device. I have tried other methods of capturing including a Palm Tungsten T5, my trusty Apple Newton MessagePad 2100 and Index Cards (Hipster PDA). No matter where I am I almost always have it with me and use it to capture all manner of action items, phone numbers, notes, calendar items, etc. I simply find the Moleskine the best device for me in terms of versatility, portability and speed. These generally all go in a running stream with a dash/plus system.
The dash/plus system goes like this. All items, no matter what they are, are treated as items to be processed. For instance, calendar items go into my calendar, phone numbers into my contact file, notes go into NoteTaker (see below), etc. Even though it is not a “next action” all items generally need to be processed in some way.The top of each page is marked with the page number and the date. The date is not used for anything other than the date the new page was started (i.e. I do not use it to track when things are added or completed, just a rough estimate thereof)
It looks something like this:
4.26.05
– Get Dog Food and treats for Roy
– Project: Proposal for new Mac purchases
+ Productivity Whitepaper project
– Doctor’s appointment 4/14/06 @ 2:00pm to Calendar
+ Call Tom Miller re: Dinner
– Phil’s Mobile: 612-555-5555
– Deposit Check
– Someday: Learn to play golf
As you can see, items have a “dash†that proceeds and, thusly, separates each item. When the item is complete, I draw a vertical line through the “dash†thus making it resemble a “plusâ€. This makes the dashed items stand out quite well despite the fact that the same color pen is used. I use a Pilot G2 Pro pen that I have modified with an extra fine .05 refill. I like a thinner line.
There are a couple of other Moleskine Hacks that I employ. I do use a Post-it™ index tab to mark the page I am currently at because while the built in ribbon page marker is quaint I find it not as efficient. I also keep some small Post-it™ notes (the 2 inch square size) on the inside back cover opposite of the pocket so that I may have somewhere to write a note to pass to someone else.
Also, I also have a way to carry items forward that works for me. Every few pages I do carry unprocessed and undone items forward and add them to the current page. When I want to carry an uncompleted item forward I draw a circle around the item’s preceding dash (thus marking that it was not completed and has moved to another page). Then on the new page I write the item and provide the page number from which that item came.
Physical Inbox
I have two physical inboxes, one at work and one at home. They used to both be the Dokument Letter Tray from Ikea. It has three tiers and looks very good. Only problem is that I have so much going on in my personal life that the home one was often filled and overflowing before I got a chance to process it. Therefore, I recently replaced it with a large cheap wire one from Office Depot that suits the purpose fine.
Next Actions, Projects and Lists
After capturing items in the Moleskine or the Inbox, all action items, projects and lists get “synced†to Backpack, a web based personal information organizer by 37 Signals. The killer feature for me is that it allows for multiple to-do lists on a page. Backpack did not have this when I first started using it but now that it does it really helped me a great deal. It was the one feature that I wished it had from the start. It has really increased my productivity and allows me to do daily and weekly reviews much more efficiently.
My Page Setup
Inbox (Home Page) – True to the spirit of GTD, the “home page” in Backpack has been re-titled “Inbox” and basically acts as a digital Inbox. There is one list on this page. One big dumping ground for any action item or project that pops into the head. Just what the name implies. Because it is on the home page it is easy to get to quickly also it is easy to get to and dump things from a mobile device and that is what you want for an Inbox. Very GTD. When time allows (daily review), two minute or less items are knocked off right away (per The David) and any projects are migrated to and fleshed out on the @Projects page or it’s own separate page (more on that in a bit).
@Projects – This page exists how I use it right now, with a separate list for each project, but with an added but important modification. I have added a topmost list titled Next Actions. N/As are then moved from the projects below to the NA list at the top via Backpack’s ajaxy drag and droppiness. This way, I go to that page and see right away the next actions for all of the projects on the page.
Individual Project Pages – Now I should take a moment here to clarify what the projects are on the @Projects page. That page is for smaller one-to-five step projects as to do anything else would make the page too confusing and long. Projects that are larger than that (my wedding for example) I actually break out into their own separate page as they may have multiple lists and sub projects. Another advantage to this approach is that you can use the other features of backpack like notes, attaching documents, etc. for things that are specific to that project. With that being said, I still make a next action list the first list on the top so I can see right away what I need to do. I have an example project page here: Sweetime Project.
@Someday – Like any good GTDer, you need a space to defer and to dream. The someday/maybe list is where you do that. Scan this as part of your weekly review.
OK, so here is the workflow in a nutshell…
1. Log into Backpack.
2. Process Items in the Inbox using the “Three D’s†(Do, Defer, Delegate). Move any projects to either @Projects, an existing project or a new project page as appropriate.
3. Switch to the @Projects page and process the Next Actions list at the top accordingly.
4. Switch to any individual project pages. Do the same thing.
5. Feel smug about your Org-fu.
Notes About Contexts
I myself do not use contexts that often. Mainly it is because I find most days too interrupt driven to have a block of time to work on a specific context list and Backpack does not seem well designed for them. I just do what I do, when I do them, where I can do them. That being said, I do foresee a way to make contexts a part of this system. Place them before the action to be done. This can be especially useful on project pages where you can group items on the Next Action list by context. For example:
Next Actions
Call – Bob re: Chocolate levels.
Call – Peter re: Additional flavors of creamy nougat.
Computer – Google map Tobelerone factory.
Computer – Look up Wikipedia entry for William Wonka.
Errand – Buy a box of Kit Kat bars for evaluation.
Another way to handle contexts would be to have multiple context lists on individual project pages. I suspect that will get messy quite fast but your milage may y.
Other Pages to Consider
The idea and motivation of all of this is to not only show you what I am doing but also to help spur ideas for you, the reader. Ultimately, the only system that works is one that works for you. That being said, here are some other pages you may find a useful part of your Backpack GTD setup:
@Waiting For – These are items that you delegated or deferred pending others but still need to track. It would be useful here to add who you delegated the item to and the date (i.e. “Call – Board Members re: Drop in stock price > Bill 06.27.06â€). Include in your weekly review.
@Stalled – This is an area for projects and/or actions that are currently inactive or stalled for an indefinite period of time. Ditto for the review.
Using Tags for Review Time
Backpack has a feature that allows you to tag pages. I have started using this feature to easily do my daily, weekly and monthly reviews. Basically, every page has one or more of these tags with the exception of the front page which has all of them. Why does the front page have them all? Because that way I can click on “daily†and it drops down a list of all of the pages I should review daily. Same with weekly and monthly. Thus allowing me to easily cycle through the pages during those review times right from the front page.
Wrapping Up
I have not been with this new setup long but it seems to be working well thus far. The “rethinking†of the front page has really been a huge time saver and helped me focus on getting things out of my effed up mess of a head fast. Simple and seemless capture and collection is the first step of what GTD is all about. I then can spend time on processing them later.
Note that I use the @ sign simply to sort these pages above the others on in the list of pages on the sidebar. I have other pages for other non-Org-fu items. I have a page for gift ideas, a personal wish list and our wedding registry that I make publicly available. Backpack is very useful like that.
One of the great parts of Backpack is that I can log in from anything that has a web browser. Secondly, I can add content to the lists via e-mail (A nifty feature of Backpack is that you can e-mail items to any page) so I can fire off an e-mail to add items from a mobile device if that is more convenient.
Calendar and Contacts
Calendar items and contacts that I capture go into Now Up-to-Date and Contact. I used to work for Now Software and am still very close to everyone there so I will stray from raving (or ranting) as it will obviously be biased. Let me suffice to say that in the 10 years or so since I have been using it, no better contact or calendar has come along for the Macintosh in my opinion.
I do not have a huge need for a robust contact manager but having a usable calendar for me is huge. I mainly use a two window setup with the Daily View and Week View open simultaneously and sitting side by side. That way I can focus on my events and meeting for the day while keeping an eye on the rest of week. Now Contact is a very decent contact manager as well and all of my contacts go into it fist and get synced to my Palm and the Mac OS X Address Book regularly.
Even though I put calendar items in Now Up-to-Date, I actually put the reminder for that item in Backpack if it is something that requires it. Why? The reminders feature in Backpack is killer. It is so simple yet so powerful. It is really simple to set a reminder and I can have it both send me an e-mail (which I then have forwarded to all of my accounts) and an SMS message to my mobile phone. This ensures that I do not miss the reminder and get it anywhere. It just plain works.
Small Notes/Bits/Misc. Info
All of the other little bits of info I capture throughout the day, quotes, passwords, little notes, etc. go into Notational Velocity. It is hard to describe Notational Velocity without describing what it doesn’t do… It does not do styles. It does not store pictures or movies. It does not do fancy outlines, link to documents or address book contacts. It does not have a fancy interface or cool features. As a matter of fact, it does not do much at all… That is what makes it so great!
All Notational Velocity does is allow you to record and search text notes. That’s it. But it does this is such a simple way and has an interface so devoid of complexity that it is almost a little bit erie when you see how powerful it is in concept. Basically, It does this by using a single text field for both searching and creating your notes. I know this sounds strange but keep trying to follow. When you start to type, it starts live searching all of your notes and their contents. If you want to create a new note just hit “return†and it will start a new note with whatever you just typed as it’s title. I know, I know, I did not grok it at first but once you get used to it you will be blown away.
It is a cocoa application so it does support all of the stuff that other cocoa applications do such as spell checking, services, etc. It also saves on the fly (i.e. it saves as you enter) and stores everything with 128 bit encryption. Oh yeah, and it is freeware so it is worth the price to download it and give it a try. It might take a little getting used to at first but once you “drink the kool-aid†it will be hard to give up.
Vertical Mapping
One of the not so often talked about principles of GTD is the idea of vertical mapping. I use the unbelievably excellent OmniOutliner Pro for this task and so much more. A vertical map is basically how your actions and projects all are part of and work towards your entire life’s roles, goals, objectives, principals and values.
This Vertical Map is broken into six “horizons of focus” that are broken out from the bottom up as follows:
Runway – Actions: The next physical and/or visible actions to take on any project or outcome. these should include calendar items, next actions on your context lists, e-mails to take action on, items to review, etc. these are the things you should be engaging daily.
10,000 ft. – Projects: These are the projects and multi-step outcomes that can be finished in a year or less. These should be part of your weekly review and should be generating the things on the runway.
20,000 ft. – Areas of Focus: These should be the areas of focus in your life and areas of responsibility in your work. This can include a high level job description, personal lifestyle checklist, etc. This should be reviewed monthly to ensure that your projects are properly aligned with these roles.
30,000 ft. – Goals and Objectives: This can include any job or personal goals you have. Twelve to Eighteen month out items to be reviewed yearly.
40,000 ft. – Vision: These are long term three to five year goals. What would success look, sound or feel like that far down the road? How will you know it when you get there? Write it down and review this once a year to make sure you are on the right path.
50,000 ft. – Purpose and Principles: This should be the beginning of everything. What is the purpose of the life you wish to live? What are the driving principles and beliefs? This can take the form of your faith, personal mission statements, personal manifestos, etc.
In other words, your actions at a daily “runway” level should be directly and vertically tied to your principals and values at the “50,000 ft” level. To get a real sense of this, look at it from the bottom up. Once you can see and understand how a project like “Fixing up the house for move In” fits into the overall goals of life (In my case “Relationships: Bethany: Life Partner”). It will give you a new drive and focus on the importance of follow through on the ious associated action items in the project. How are the projects you perform at work fitting into your job description? If the project is not fitting into that description or role then is your role changing or is that project better delegated to someone else more appropriate?
There is real power in this. It really helps you focus and align your life along a path that gives each action meaning and context. Using a powerful outliner is key for me to be able to vision these items.
For e-mail, I use Mail.app which is the Apple’s mail program built into Mac OS X. I find it more than enough to meet my needs without any further plugins or tweaks. I process all incoming e-mail and keep my inbox at or very near zero messages daily. While I could never match the genius of Merlin (most of the tips and tricks I will state here are taken from his ious posts on the subject) I felt I would break my e-mail fu down for inspiration to those who doubt it is possible.
Now, let me go on to say that there are many out there (Princess Bethany for instance) that function perfectly well with a few hundred e-mails in their inbox. That may work for you and you are not overwhelmed by that kind of e-mail pile. It is OK. I’m keepin’ it real. There is no right or wrong. No shame or blame.
I was not one of those people. I used to average 300 plus e-mails in my inbox. Some of them languishing for weeks before I got to them and responded in some way, if I got to them at all. Most often I would forget I even got that simple client question or e-mail from a friend I have not corresponded with in a while. Basically, a lot of balls were often dropped because I was never really certain what really needed my attention and what was just noise.
Here is what I did to get back in control:
First step… Get to know your “Delete†key. It is in a three way tie with for the best productivity tool ever with the Trash Can and the word “Noâ€. You will use this key for a vast majority of the e-mail that you receive. The junk, the special offers from the companies you have purchased products from, the joke e-mails that your “friends†blast you with – all of these should be blasted into the ether almost as soon as you receive them (of course, you could always unsubscribe and tell your friends to take you off those ridiculous mailings to begin with).
Next, the setup. I basically use a version that was originally outlined in and article in Macworld magazine by Merlin Mann titled “The inbox makeoverâ€. My setup is an almost exact duplicate of that one so go check it out for the fine details. I have the following folders on my IMAP account so it is the same no matter what computer I am using:
Inbox – Where it all comes in. I respond to the ones that take a minute or less when processing
@Action – For anything requiring a quick response that I don’t do as soon as it comes in
@Hold – Receipts, shipping confirmations, or anything I want to hold for a short period before archiving.
@Respond – For anything that requires a longer than 2 minute response or further research before responding.
@Waiting – For items that require something from someone else before I can respond.
Archive – Everything ends up here.
See, I told you it was a copy of Merlin’s system. It does have one slight modification. I have swapped the uses of Action and Respond as those terms make more sense to me this way. Also, the “@†signs are simply there to make things sort above the Archive folder, otherwise Apple’s Mail insists on sorting alphabetically.
Here is how this works in practice:
1. E-mail arrives in the Inbox.
2. I evauate the e-mail and decide if I should delete it, archive it, sort it into one of the other folders or reply to it.
3. If it requires a quick reply, and I have the time, I reply to it and then Archive it.
4. If this is not the case then it is sorted into one of the other folders as appropriate. For instance, if it requires a short response I stick it in the Action folder, longer responses in the Respond folder, etc. I cull these folders regularly as time allows. If I get a 15 minute chunk of time then I go through my Action folder and fire away at those for instance.
5. Once an e-mail is responded to it is moved into Archive.
I also use some other strategies to keep things under control. For instance, not checking my e-mail regularly. I have my mail program check for new mail once an hour. That way, I can process in chunks rather than nibbling away at each mail as it arrives like some sort of Pavlovian experiment. I check my e-mail at the office even less frequently. The urgent stuff there people call me for anyway. I also use my Gmail account for most online signups in order to reduce the semi-junk (special offers and announcements) I receive and I only check that every few days. I use filters to sort the couple of mailing lists I am on and run through those as time allows.
The bottom line is that every email that comes in has some sort of decision made about what to do with it and dealt with accordingly. This starts with the simplest of questions – “Does this require action?†If the answer is no then I delete or archive it immediately. That reduces a good 60% of the e-mail that comes into my Inbox. If the answer is “yes†then I make strategic choices based on time and resources on how to respond to the e-mail.
It really is that simple my friends.
Research and Notes
My day job, as well as several personal projects, often requires research of a topic or subject. This research may be items from the web, documents, PDFs, etc. Not to mention notes I may take or recordings of conversations or interviews. There are also times when I need to find a home for a favorite quote or recipe. For these, I use the very cool Notetaker from Aquaminds.
On its face, Notetaker is a basic notebook, like a paper multi-subject notebook. It even has spiral rings and tabs on the side to indicate the ious sections. You can create and have as many separate notebooks as you wish. I have three – one for personal items, one for my consulting business and one for my day job.
NoteTaker has a parent child multiple entry style that makes it a powerful outlining tool as well but I generally use it as a way of organizing and defining otherwise free form information. Because it can store images, sound files, movie files, take recordings and link to key documents, it is ideally suited for research.
Furthermore, it leverages the built in Services feature of Mac OS X to clip information from other sources (for instance, documents, e-mails and web pages) into new entries in your notebook. It will also include header information about the source application where the information came from. It will even automatically timestamp the entry for you.
But the real surprise is when you enter a URL (web site address) into a notebook, it places a little “@” sign next to the entry. Double clicking on the text of the link will launch your web browser and bring you to that page. Double clicking on the “@” sign will load the page in a little mini browser, in line, right there in your notebook’s page. How cool is that?!
While I still use Notational Velocity for the little snippets and OmniOutliner Pro for serious outlining, Notetaker still gets regular use and it is my go-to tool when I need a tool that will tie several pieces together. As a matter of fact, my notebooks basically act as a digital commonplace in this way. If it is something of importance that I want to remember in the future it will probably end up here.
Physical Notes
For someone who spent many of his earlier digital years heralding the downfall of paper, I sure have become one of it’s more vocal proponents. For years I pretty much eliminated paper for most areas of my life. I used a Newton MessagePad to keep everything I possibly could as digital and far removed from paper as possible. As a matter of fact, I owned every single model of Newton released. The irony is that what made the Newton so useful to me was it’s adherence to the paper metaphor. I basically used it most of the time the same way that I would ink and paper and, by the end of the product line, the handwriting recognition was so good that I was able to do so with very little need for correction. The fact is, I never really left the idea of paper at all.
I love paper. I adore it. I love the idea of it. I love the simplicity and ease of being able to capture a thought in a manner that is only bested and made more personal by speaking it. I love to go back and read over what I have written. I love ink too. I love the way it flows and the minor adjustments and imperfections of the written words. I even love my handwriting (and believe me it is such that only I could love it). I am a complete paper snob. It is for this reason that I have no problem laying down good money for good paper. And if you want to lay down some good money for paper, I can think of no finer places to do so than Levenger and Moleskine.
I mainly use Levenger Notepads for my day job in IT for a four year liberal arts college. They are ideal for meeting notes and lists – which is principally what I use them for. The paper is bright, thick and takes ink from a fountain or gel pen easily (I use Pilot G2 pens). They have a loose Cornell Style arrangement that has spaces at the top for Topic, Date, File Under and Page Number and a wide left hand margin for marking up metadata on notes and other items. For personal use, I use a Large Moleskine Ruled Notebook which basically acts as a analog commonplace very similar to the way I use NoteTaker as described above.
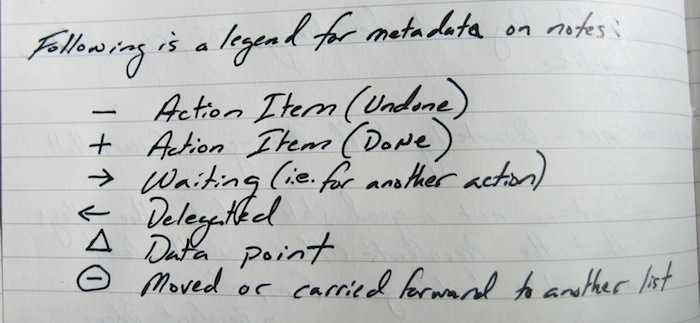
I have recently come up with a metadata markup system that evolved out of the “dash/plus†system that I use for action items in my Pocket Moleskine. I will try to describe it as best I can with text but it is better viewed so I have included a link to a picture:
– (Dash): Undone Action Item.
+ (Plus): Done Action Item.
< - (Left Arrow): Delegated (with a note to whom and the date).
-> (Right Arrow): Waiting – (i.e. for another action).
^ (Triangle): Data Point.
O (Circle): A circle around any of the above means that it has been carried forward, moved to another list or otherwise changed status – i.e. a “Waiting†item has now become an Action Item elsewhere (with a note about where that item has gone).
Not sure is this is making sense so here is a picture to help:
The beauty of this system is that it is all built upon, and extensions of, the original dash. Therefore, it is easy to change items from one state to another (an undone action item to a done one, an undone action item to waiting or delegated) and in the case of an non dashed item changing completely I circle that item to denote that.
I am considering replacing the Levenger notepads with a Levenger Circa Notebook in order to keep things a bit more organized and complete but am not quite ready to cross that expensive bridge yet.